

External Cat6 Cable Guide for Reliable Outdoor Networks
- Craig Marston
- Dec 18, 2025
- 14 min read

External Cat6 cable is built to shrug off rain, frost and relentless UV rays while still delivering full gigabit speeds. With a UV-stabilised jacket and moisture-resistant, gel-filled core, it stands up to whatever the elements throw at it. No wonder data centres, hospitals and commercial sites trust it for their outdoor network runs. Our Excel Network accredited partners also specialise in fibre cable installation, ensuring robust multi-technology outdoor networks with certified and tested delivery.
Key Benefits Of External Cat6 Cable
The first line of defence is a robust polyethylene (PE) jacket. It’s like a tough tarpaulin wrapped around your cable, stopping sun damage and those pesky surface cracks.
Inside, a gel-filled core seals out water and dust. Keep those twisted pairs dry and your signal stays rock-solid, even if the Yorkshire skies open up.
Compare it to indoor Cat6 and you immediately notice fewer dropouts and a cable that can go the distance.
UV-Stabilised Jacket: Guards against sunlight degradation
Gel-Filled Core: Seals out water and contaminants
Moisture-Blocking Design: Maintains signal integrity in damp conditions
Enhanced Shielding: Reduces electromagnetic interference near power lines
“Choosing Excel Network accredited installers ensures tested network delivery and a 25-year manufacturer warranty—a crucial safeguard for mission-critical installations.”
Demand for structured cabling in the UK is climbing. In 2024, the market hit USD 858.6 million and it’s forecast to double to USD 1,684.2 million by 2033. For the full picture, read the Grand View Research report on the UK structured cabling market.
You can see here how the twisted pairs and layered jacket come together to cut crosstalk and protect each conductor. That’s why organisations rely on outdoor-rated Cat6 to power cameras, link rooftop Wi-Fi access points and connect sensors up to 100 m away without dropping a frame.
Real World Applications
Outdoor Surveillance Links: Keeps video feeds live at hospitals and commercial sites
Wi-Fi Backhaul: Bridges rooftop APs to comms rooms with rock-solid throughput
Accreditation And Warranty
Work with an Excel Network accredited installer and you get:
Certified Testing Reports: Continuity, insertion loss and crosstalk measurements
25-Year Warranty: Materials and workmanship covered
Cable Management: Neat installations and hassle-free maintenance—keeping equipment rooms tidy and desks clutter-free
Office Relocation Support: Equipment testing, re-certification and fresh documentation for moves
These pros deliver tested network infrastructure on time. It’s the difference between a reliable outdoor link and costly downtime.
With these benefits in mind, IT managers in commercial buildings and hospital estates can map out their next outdoor network with total confidence. Next, we’ll explore shielding options and jacket constructions to help you pick the perfect external Cat6 cable.
Comparing Construction And Shielding Options
Outdoor-rated Cat6 cable is built in layers to fend off UV exposure, water ingress and electromagnetic interference. Think of each layer as a slice of armour that your data hauls through sun, rain and electrical noise without faltering.
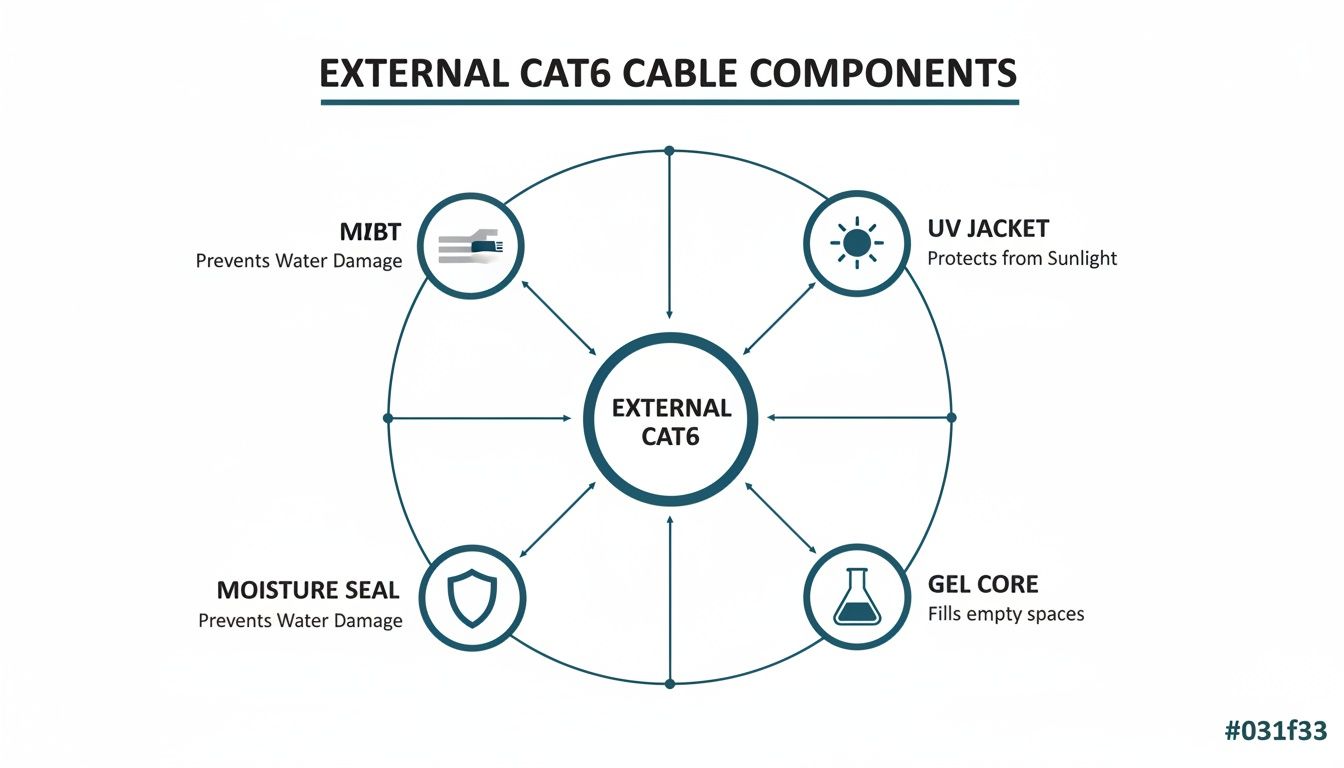
In this graphic, the UV-Stabilised Jacket, gel core and moisture seal stand out as the frontline defences. Together they keep sunlight, damp and grime from compromising performance.
Shielding Methods Explained
Imagine your cable pairs stashed in lunch boxes—each box keeps stray ‘crumbs’ of interference away from the lines inside. Here’s how the main shielding options stack up:
UTP (Unshielded Twisted Pair) No extra shield. It’s flexible, cost-effective and ideal for runs where EMI is negligible.
FTP (Foiled Twisted Pair) One foil layer envelops all pairs. Strikes a balance between basic EMI protection and easy handling.
STP (Shielded Twisted Pair) Each pair gets its own foil plus an overall braid. Best for high-EMI zones like electrical switch rooms or dense outdoor trays.
Shielding Type Comparison
Below is a quick reference table to help you match shielding styles with their core traits and perfect outdoor spots.
Shielding Type | Characteristics | Ideal Applications |
|---|---|---|
UTP | No shield; lighter and highly flexible | Short external runs under 20 metres |
FTP | Single foil wrap for moderate EMI defence | Rooftop trays within 3 metres of power |
STP | Pair-level foil plus braid for robust EMI blocking | Garden or park runs exceeding 50 metres |
Use this chart to guide your cable choice and ensure reliable performance outdoors.
Practical Shielding Scenarios
Different outdoor sites demand tailored shielding:
For rooftop trays near transformers, pick FTP to block most crosstalk without hefty costs.
In gardens or parks where runs exceed 50 metres, go for STP to keep EMI from degrading your signal.
Under 20 metres with minimal interference, UTP delivers all you need on a budget.
Choosing The Right Jacket Construction
Your cable’s jacket is like a weatherproof coat. Polyethylene jackets come in various thicknesses and UV ratings to suit different environments.
Standard PE Jacket Offers solid UV resistance for rooftops but can stiffen in freezing conditions.
Heavy Duty PE Jacket Thicker walls absorb impacts and abrasion in high-traffic external pathways.
Gel-Filled Core Sits inside the jacket to seal out moisture and complement the outer seal.
> Proper shielding and jacket selection reduce network failures and slash maintenance costs.
Professional installers at Constructive-IT follow Excel Networking accreditation processes for tested network delivery and warranty support.
Want to dive deeper? Check Your Essential Guide to Cat6 Cable for a thorough breakdown of shielding layers and specifications.
Example Shielding Decision
At a large hospital, a 70 metre rooftop run skirted HVAC units pumping out heavy EMI. Engineers opted for STP cable wrapped in a heavy-duty PE jacket. This combo kept gigabit CCTV feeds rock-steady without a hint of signal drop.
Key Takeaway: Pair STP shielding with robust jackets for the harshest electromagnetic environments.
Even if your budget nudges you toward FTP when EMI is only moderate, remember that reduced maintenance calls and network uptime often offset the initial spend.
Consider each scenario carefully to strike the right balance.
Assessing Environmental Ratings And Standards
When you send Cat6 cable outdoors, you’re up against relentless UV rays, driving rain and even the weight of snow. Whether you’re mounting it in a rooftop tray, threading it through conduit or nudging it underground, understanding those spec sheets is your first line of defence.
Start by checking the IP rating—that two-digit code tells you how well the jacket fends off dust and water. An IP66 cable shrugs off high-pressure jets, while IP68 can stay submerged indefinitely. Think of it like testing the waterproof seal on a dive watch before you plunge in.
UV resistance is just as crucial. It’s the suncream your cable wears to prevent cracking and discolouration. Higher UV classes mean more sun-block on the jacket, so it stays supple instead of brittle.
Understanding UV Resistance Classes
UV1 to UV2: Ideal for runs hidden in shaded conduits and under eaves
UV3 to UV4: Solid for rooftop trays or wall-mounted pathways
UV5: Heavy-duty protection where the jacket bakes in full sun
Match your installation zone to the right UV class and avoid cables that degrade into dust over time.
Interpreting IP And Water Blocking Ratings
The first digit of an IP code covers solid particle protection, the second covers liquid ingress. Many outdoor cables also include water-blocking gel or swellable tape—imagine a flood defence wrapping each twisted pair.
“A gel core and IP68 rating ensure reliable performance in underground or flood-prone areas.”
Analysts predict a UK CAGR near 10.2% for Ethernet and Category-6 structured cabling between 2023 and 2030. That growth mirrors businesses demanding tougher, outdoor-ready networks. Dive deeper into these numbers on Global Insight Services.
Decoding Industry Standards
Standards are your guarantee of performance and compliance. ISO/IEC 11801 lays down channel requirements worldwide, while the TIA-568 series governs installation best practices. You’ll also encounter:
CPR classes dictating flame spread
WRAS approval for any cable that touches potable water in buried runs
Think of CPR like a building’s fire doors, and WRAS like the seal on a drinking-water pipeline—both keep you on the right side of UK regulations.
Environmental Rating Summary
Below is a quick reference to help you compare ingress and UV protections at a glance.
Rating | Protection | Application |
|---|---|---|
IP66 | Dust-tight; high-pressure water jets | Rooftop trays and wall-mounted conduits |
IP68 | Dust-tight; continuous immersion | Direct burial and underground ducting |
UV4 | Moderate UV resistance | Exposed rooftop and external wall runs |
UV5 | Maximum UV blocking | Unprotected roof lines in full sun |
Gel Core | Internal moisture seal | Runs in damp or flood-risk locations |
Use this table to speed up your spec review and pick the right cable without wading through every datasheet.
Selecting cable with the correct UV class, IP rating, gel fill and approvals secures your full warranty support and keeps you in line with Excel Network accreditation. Whether it sits in conduit, buried underground or across rooftop trays, a compliant Cat6 run will perform reliably for years.
Cables meant for direct burial often feature a corrosion-resistant copper drain wire. That thin conductor steers electrical surges safely to earth—your built-in lightning conductor. Add weather-rated glands, proper earthing and quality O-ring or silicone seals at every entry point, and you’ll lock out moisture for peak network performance day after day.
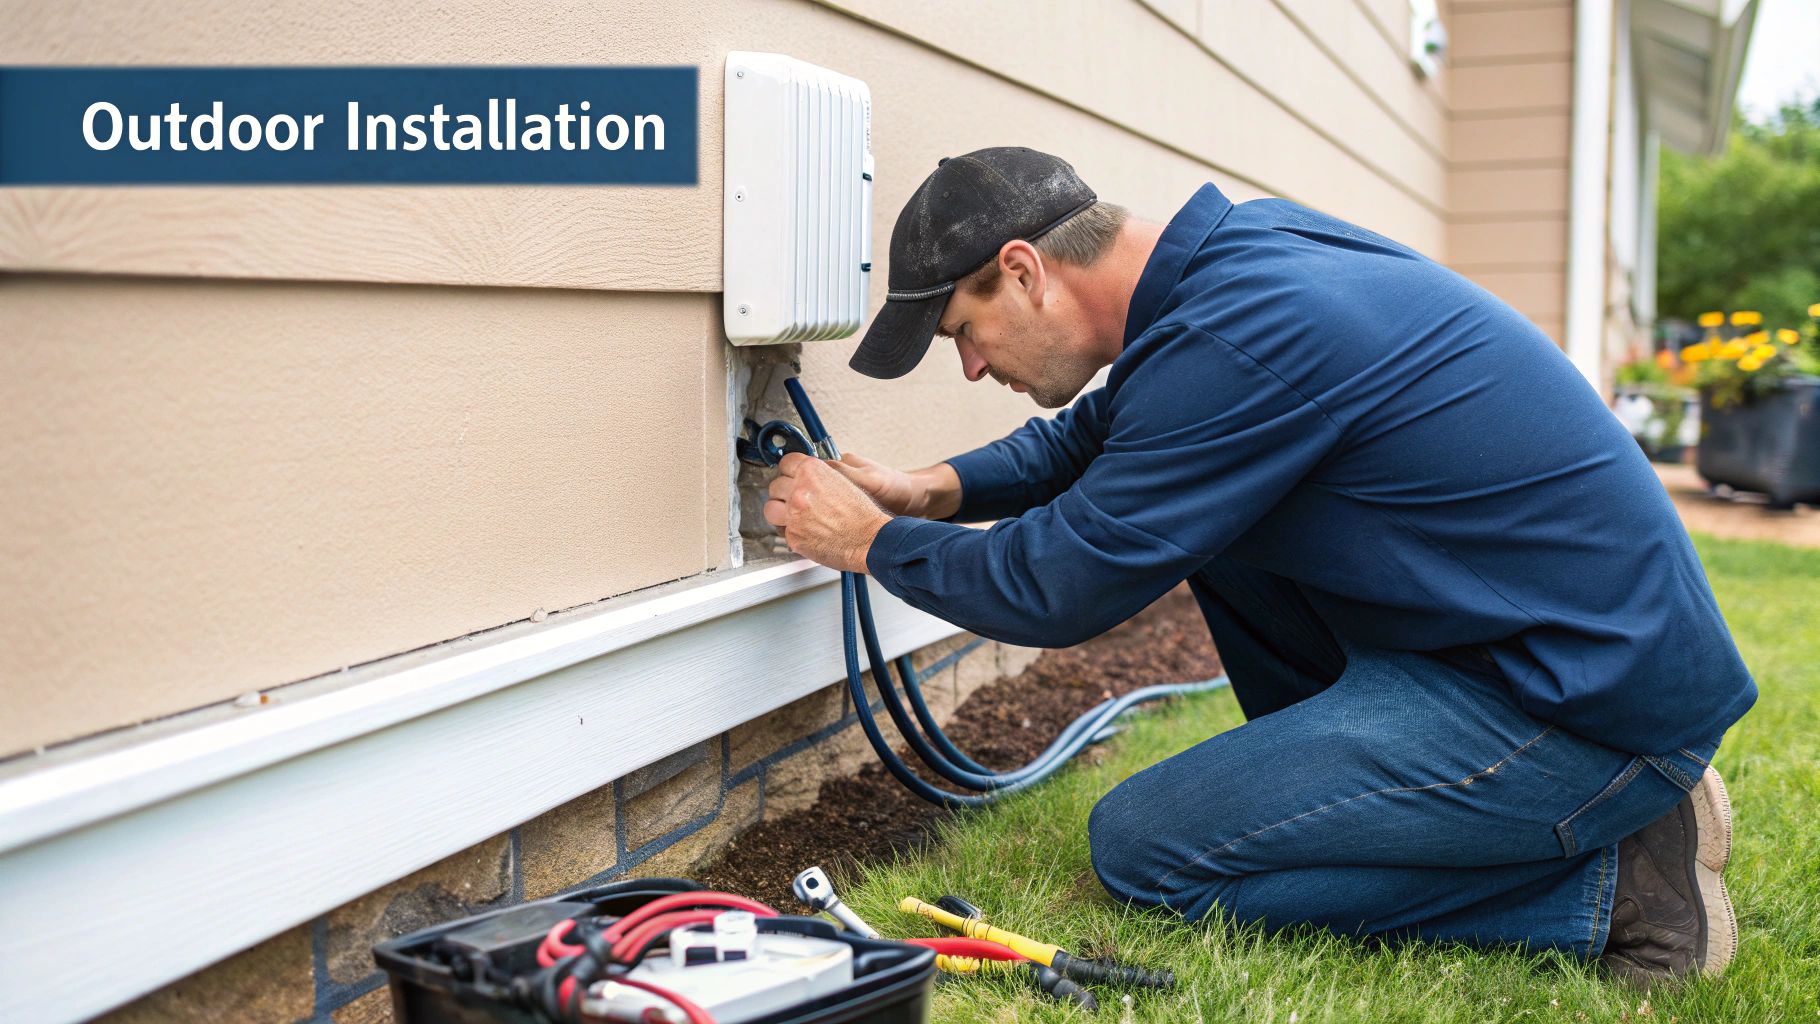
Implementing Installation Best Practices Outdoors
Installing external Cat6 cable outdoors is not just about unspooling a wire and hoping for the best. If you skip proper planning, signal quality suffers, and moisture or UV damage can creep in. For instance, connecting a garden Wi-Fi point back to your comms room demands a thoughtfully mapped conduit to dodge tight bends and standing water.
For fibre cable installation, similar principles apply but with stricter bend radii and termination practices. Use purpose-built fibre connectors, patch panels and follow gentle handling to prevent attenuation and ensure full gigabit or 10 Gbps performance.
Start by charting your path from the outside point to the rack. Measure distances accurately, decide where the conduit enters your building and pick a tube size that respects bend radii. Talking to your facilities team early on pays dividends—you’ll avoid cables strung across ceilings and instead deliver a neat, sealed entry into the comms room.
The diagram below shows a typical conduit entry through an external wall.
This screenshot highlights how conduit, gland and internal radius combine to shield the cable from water and abrasion over time.
Planning Conduit Pathways
A well-sized conduit does more than tuck cables away—it protects performance. Aim for no more than 25% fill when running a single Cat6 feed and leave breathing room for future fibres or extra pairs.
Key Points:
Keep power cables at least 300 mm away
Respect a bend radius of 4 × cable diameter
Secure with UV-stable clips every 1 m
Incorporate inspection boxes on long runs
For underground routes, go with direct burial conduits rated against soil acidity and rodents. Lay detectable warning tape 150 mm above the run to flag its location during later digs.
Such careful routing is essential for Excel Network accreditation and keeps your outdoor cabling delivering as tested.
Choosing And Installing Glands
Where your conduit pierces brick or cladding, a properly torqued gland is your first line of defence. Most O-ring styles call for 2.5 Nm on metal thread.
“Applying the correct torque on glands secures the seal and prevents hidden water ingress,” advises Constructive-IT’s senior network engineer.
Installation Steps:
Drill the hole size from the gland datasheet and de-burr edges
Push the gland home until the O-ring sits flush against the wall
Tighten to the specified 2.5 Nm using a calibrated wrench
Seal around the gland with silicone for extra peace of mind
Opt for silicone-based O-rings designed to withstand UV without cracking. A sealed gland keeps water, dust and even small pests well away from your precious cable.
Grounding And Surge Protection
Outdoor cabling faces lightning, static charges and stray currents. Layer your defence by installing a Type 3 arrestor right at the cable entry and a Type 2 at your main distribution board. Use drain wires larger than 16 AWG to meet warranty requirements.
Most external Cat6 cables include a copper drain-wire ready to bond. Simply lug it onto your earth bar and you’re part-way there.
Surge Arrestor Checklist:
Mount within 3 m of the entry point
Tie its ground to the same earth bar as the drain-wire
Verify earth continuity under 5 Ω with a clamp tester
These steps redirect dangerous voltage spikes away from switches and routers.
Cable Management And Common Pitfalls
A tidy run cuts maintenance time and guards against hidden faults. It also keeps the workspace or equipment room clutter-free for a tidy desk environment. Best practice includes:
IP-rated trunking or braided sleeving
Durable label markers at each end
Avoiding bends tighter than the jacket can tolerate
Record every conduit path and gland location in your documentation system. Fasten cables with UV-resistant ties every 300 mm to prevent sagging.
Watch out for these slip-ups:
Overbending at entry points
Skipping earthing entirely
Leaving extra holes unsealed
“A neat installation simplifies future testing and maintains full warranty support,” notes a Constructive-IT project manager.
Working with an Excel Network accredited installer like Constructive-IT means you’re backed by certified test reports and a 25-year equipment warranty. It’s the difference between a quick fix and a lifetime of reliable performance.
Find out more in our Essential Guide to Data Cabling Installation.
Implementing these practices gives you a weather-proof, durable external Cat6 run that resists UV, moisture and mechanical wear. Next, we’ll explore formal testing, certification and warranty activation to guarantee your network’s integrity.
Certifying Testing and Securing Warranties
When you send data across miles of cable under a blazing sun or in a rain-soaked trench, you want absolute confidence that every link works. That’s why putting your external Cat6 cable through its paces with proper testing isn’t just a nice-to-have—it’s essential. Think of it like a pilot’s pre-flight checklist: miss one step, and the entire flight could be grounded.
Industry-grade testers inspect each twisted pair to root out hidden faults. They measure insertion loss, check for crosstalk and continuity, and flag anomalies long before anyone flips the switch. This hands-on verification ensures outdoor runs on commercial campuses or hospital sites stay rock-solid from day one.
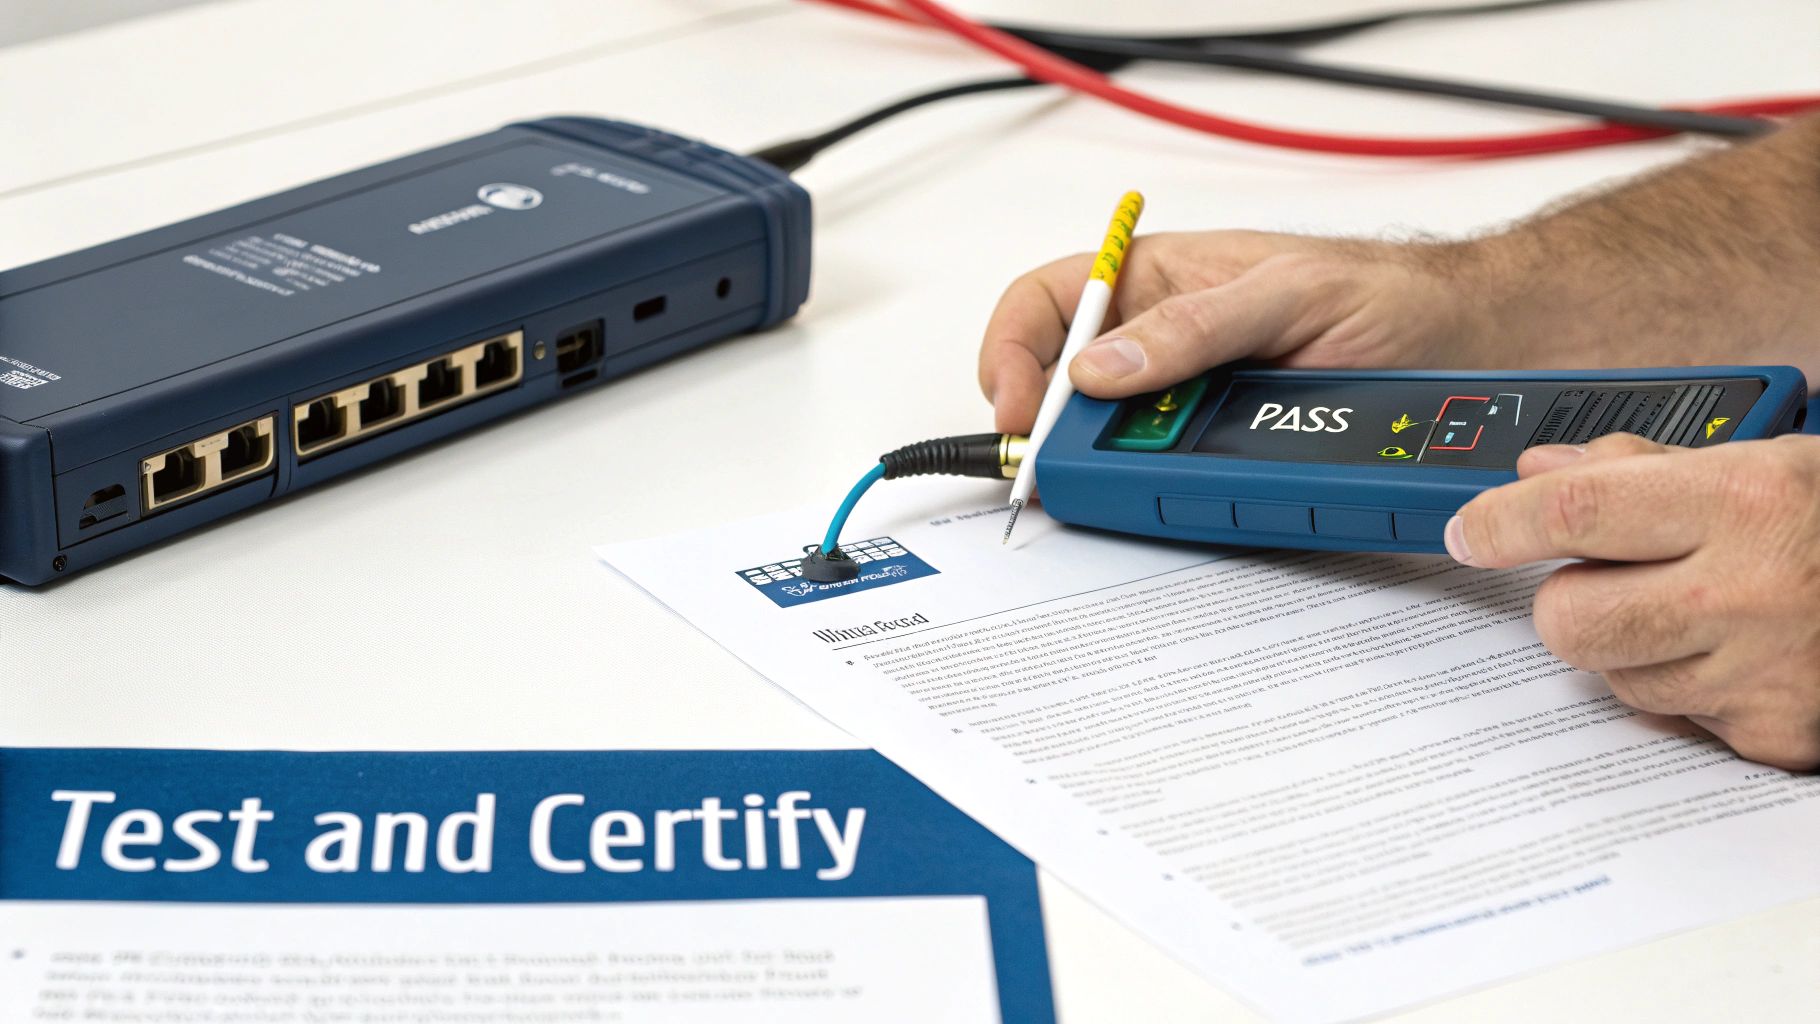
That snapshot from the Fluke tester shows green ticks and red crosses next to each pair—return loss, continuity, NEXT—all laid out clearly so you can nip any issue in the bud.
Test logs aren’t just for show. They become the formal records you present for Excel Network accreditation, demonstrating compliance with TIA-568 and ISO/IEC 11801 standards. In healthcare environments, where even a momentary outage can have serious consequences, these documents are your safety net.
Technicians deploy calibration-certified certification tools built to withstand UV rays, humidity, and temperature swings. By catching tiny imperfections—like a slight bump in insertion loss—before they escalate, you avoid costly call-outs and downtime in mission-critical settings.
Ready to dive into the exact steps? Let’s unpack the testing protocol.
Industry Standard Testing Procedures
Verify Pair Continuity Plug in each conductor, confirming there are no opens or shorts before moving on.
Measure Insertion Loss Compare the signal strength before and after transmission to ensure it stays within TIA-568 thresholds.
Assess Near-End Crosstalk Gauge interference between pairs—keeping it well under the limit avoids data corruption.
Record Test Results Save digital logs with timestamps and site identifiers for warranty and audit purposes.
“A certified test report is your network’s insurance policy, ensuring compliance and warranty eligibility.”
After the scan, technicians compile a detailed report that covers:
Tester Details: Model, calibration date, firmware version
Cable Information: Part number, shield type, jacket rating
Test Metrics: Pair continuity, insertion loss, NEXT, return loss
Location Tags: Endpoint IDs, building zone, rack numbers
These records make troubleshooting straightforward by pinpointing exactly where insertion loss or crosstalk crept in. If a run doesn’t pass, the team simply re-terminates the connector or re-scans the suspect section—no guesswork involved.
Securing 25-Year Equipment Warranty
A 25-year equipment warranty isn’t automatic. Manufacturers expect proof your installation meets all their conditions—usually within 30 days of commissioning.
By working with an Excel Network accredited partner like Constructive-IT, you tick every box. Here’s how to seal the deal:
Collate Test Reports Export certified logs and annotate them with precise site details.
Verify Installer Credentials Include your Excel Network accreditation reference and the lead technician’s name.
Submit Documentation Upload everything via the manufacturer’s portal or email it to their support team.
Confirm Warranty Activation Receive a written certificate and reference number—file it safely.
Securing that warranty means fast-track replacement or repair if a cable ever fails. In a hospital network, that peace of mind can literally be a matter of life and death.
“Our certified testing workflow and Excel Network accreditation deliver peace of mind for large-scale commercial installations, backed by a 25-year warranty.”
Once certification and warranty are in place, you can relax knowing your outdoor Cat6 runs will deliver consistent performance for decades. For guaranteed compliance and a future-proof network, let Constructive-IT handle your next installation. Our team’s accreditation and testing expertise remove any risk of network faults.
Contact Constructive-IT today for full certification and warranty support tailored to your outdoor network needs.
Procurement Checklist And When To Seek Professionals
Ordering the wrong outdoor cable can stall an entire project. A clear checklist helps you avoid last-minute rushes, hidden costs and network hiccups.
By breaking down materials, ratings and compatibility up front, you’ll steer clear of faulty batches and warranty headaches.
Procurement Checklist
Jacket Material: Choose a UV-stabilised PE jacket. It weathers years of sun and temperature swings without cracking or degrading.
Fibre Cable Requirements: Comply with outdoor ratings, bend radius, connector types, and ensure you have fusion splicing or pre-terminated assemblies for minimal signal loss.
Shielding Type: Match UTP, FTP or STP to your installation. STP, for instance, shines close to heavy machinery or power lines where EMI interference is highest.
UV And Burial Ratings: Look for IP68 on buried runs and UV5 for rooftop installations. Water-blocking gels and swellable tapes add an extra layer of moisture defence.
Connector Compatibility: Double-check that your RJ45 plugs or O-ring glands suit the cable diameter and shielding. A tight fit keeps insertion loss to a minimum.
Certification Requirements: Ensure compliance with TIA-568, ISO/IEC 11801, CPR and WRAS. These standards unlock a 25-year equipment warranty and Excel accreditation.
Factor in the 20–50 % price premium of outdoor Cat6 over indoor equivalents. That uplift covers UV-resistant jackets, water-blocking elements and beefed-up shielding. In UK professional installs, short-run costs typically sit between £35–£120 per link once labour and testing are in the mix. Learn more about outdoor Cat6 cable market findings on Verified Market Research.
When To Seek Professional Installers
Deciding whether to tackle a run in-house or call in the experts can save you weeks of rework and surprise bills.
“Engaging an Excel Network accredited partner like Constructive-IT guarantees tested network delivery and prevents costly data network mistakes,” notes a senior network engineer.
Criteria | In-House Team | Accredited Partner |
|---|---|---|
Experience | Variable outdoor cabling knowledge | Proven track record in complex sites |
Testing And Certification | May lack specialised testers | Certified test reports included |
Warranty | Self-managed risk | Backed by 25-year equipment warranty |
Cost | Lower initial labour rates | Labour from £35–£120 per link |
Risk Of Rework | Higher if standards slip | Minimized through expert processes |
Scope | Cat6 only | Cat6 & fibre installations covered |
Error Prevention | Higher chance of data network mistakes | Avoids data network mistakes |
For tricky conduit runs, proper earthing and surge protection, an accredited installer brings the right tools and know-how.
Check out our guide on how to choose network cabling installers you can trust for further advice: Choosing Network Cabling Installers You Can Trust.
Example Procurement Scenario
Imagine a university needs a 60 m rooftop Cat6 link. You’ll need heavy-duty PE jackets, STP shielding and precise labour estimates for conduits.
Breaking it down into steps keeps everyone aligned:
Identify Cable Specs – List jacket type, IP/UV ratings, shield category, length and connector style.
Source Quotes – Gather pricing, lead times and accreditation status from multiple suppliers.
Confirm Site Conditions – Map out conduit paths, entry points and earthing needs.
Allocate Budget – Roll in the 20–50 % price premium plus labour for conduit and glands.
Review Documentation – Ensure a test and certification plan is signed off.
Follow this process and you’ll sidestep procurement pitfalls—and secure a network that stands up to the UK weather. Plan with confidence.
FAQ
Got questions about external Cat6 cable? You’re in the right place. Below, we tackle the key concerns around installation, ratings, testing and when to call in the pros.
What Makes External Cat6 Cable Different From Indoor Cable?
Think of indoor Cat6 as a city car—perfect for smooth, climate-controlled roads. External Cat6 is more like an off-road 4x4. It’s built to shrug off harsh UV rays, trap moisture and block interference.
UV-stabilised jacket for prolonged sun exposure
Gel-filled core to keep water at bay
Enhanced shielding to cut down EMI disruptions
How Do I Interpret UV And IP Ratings On Outdoor Cable?
UV and IP ratings tell you how well the cable survives the elements. UV grades run from UV1 (light shade) to UV5 (full sun), while IP ratings measure dust and water defence.
UV1–UV2 for shaded runs under eaves or inside conduits
UV3–UV4 on walls and soffits with occasional sun
UV5 on rooftop trays in direct sunlight
IP66 to repel high-pressure water jets
IP68 for immersion and direct burial
In other words, choose UV4/5 for exposed runs and IP68 if you want to bury the cable underground.
Understanding Testing And Certification
Testing isn’t an afterthought—it’s your network’s health check. A proper certification process gives you peace of mind and locks in that 25-year warranty.
Use a Fluke-style tester to verify continuity, insertion loss and crosstalk
Tag each endpoint and record pass/fail results for warranty compliance
Submit certified logs within 30 days to activate manufacturer coverage
“A certified test report is your network’s insurance policy,” says a Constructive-IT engineer.
What Steps Ensure Proper Testing And Certification?
Treat your cable run like a patient in for a medical check-up. Follow TIA-568 and ISO/IEC 11801 standards:
Confirm pair continuity
Measure insertion loss and NEXT
Label and store reports with site identifiers
Doing this in sequence guarantees you meet industry benchmarks and keeps your documentation rock-solid.
When Should I Hire A Professional Installer?
For complex conduit layouts, hospital-grade specs or simply to safeguard your warranty, bring in an Excel Network accredited partner. It saves time, avoids DIY pitfalls and ensures mission-critical systems stay live.
“Expert installers deliver peace of mind and full warranty support.”
Protect mission-critical uptime every day.
Trust Constructive-IT today for reliable outdoor cable installations with certified testing and a 25-year warranty. Visit Constructive-IT to learn more.
Comments